Home › Devices › Nintendo › Game Boy Pocket
 NEW!
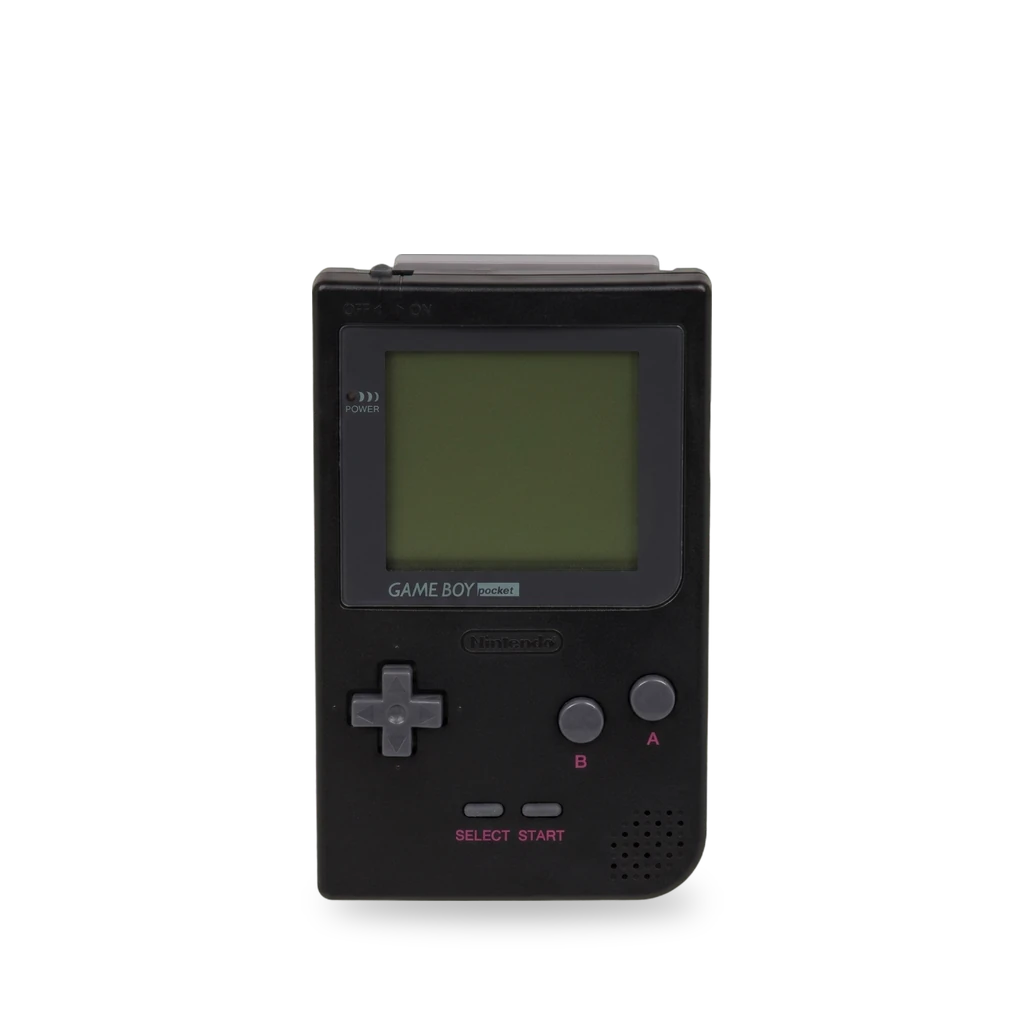
Photo: Evan-Amos, Public domain · AI-edited (studio background)

NINTENDO · HANDHELD CONSOLE · 1996
Game Boy Pocket
Also called: MGB-001 · GBP
Nintendo's Game Boy Pocket, released in September 1996. It is the second Game Boy. It has a black-and-white screen and runs on two AAA batteries.[1]
Which one do I have?
| Model | Variant | Year | How to tell |
|---|---|---|---|
| MGB-001 | Game Boy Pocket | 1996 | Released in September 1996. It is the second device in the Game Boy line. Model and serial numbers are printed on a label on the back.[1] unverified |
Mods (6)
⚠ Mod at your own risk. We collect what others have published; we have not tested these mods. Read the safety notes
IPS screenWorks
IPS kit with color palettes and a larger screen. You solder a power wire and the touch unit, and an original shell needs its inner plastic trimmed.[3][4][2]
Parts
- FunnyPlaying GBP/GBL Retro Pixel IPS LCD Kit Fits with conditions — Screen is 11% larger than the original Pocket display. Trim the shell's inner plastic, or use an aftermarket shell made for IPS installs.[3] Buy: funnyplaying.com
Good to know
- The panel draws 0.3 W to 0.8 W. It has 36 built-in color palettes and a pixel-grid effect.[3]
- After you solder the power line and the touch unit, the original contrast wheel sets brightness.[3]
- The kit comes with the IPS LCD, a driver ribbon cable, an adhesive gasket, and an optional touchpad. Soldering is a power wire and an optional touch wire.[4]
- Tools for the install are a tri-wing screwdriver, a Phillips screwdriver, a soldering iron, Kapton tape, and a spudger.[4]
- The case uses six Y1 tri-wing screws: four on the back and two in the battery compartment. Three Phillips #1 screws hold the motherboard.[2]
⚠ Watch out
- An original shell needs its inner plastic ribs trimmed. An aftermarket shell made for IPS installs does not.[3][4]
- The maker says two AAA cells (1100 mWh max) last about 3 hours with original carts, and less with flash carts.[3]
- The maker says alkaline cells can drop below 1.3 V and the screen can flicker. They recommend 1.5 V constant-voltage lithium AAA batteries.[3]
Guides:Mod Guide: Game Boy Pocket FunnyPlaying IPS LCD – residual media depot
TFT backlit screenExperimental
An MGB TFT backlit kit from Retro Modding can bring back a Pocket with a broken screen. Its screen is smaller than the original.[5]
Parts
- MGB TFT backlit kit (Retro Modding) Fits with conditions — The kit has a backlit LCD, a PCB with a ribbon cable, 3M foam tape, and a bracket. The supplied bracket did not fit the shell and had to be clipped.[5]
Good to know
- The kit has a backlit LCD, a PCB with a ribbon cable, 3M foam tape, and a bracket.[5] unverified
- The kit is used to get a Pocket with a broken screen working again. Its LCD is much smaller than the original.[5] unverified
Guides:Mod Guide: Game Boy Pocket Backlit LCD – residual media depot
Replace the original screenWorks
iFixit rates an original LCD swap Moderate: about 10 to 20 minutes and 7 steps.[2][1]
Good to know
- The guide is rated Moderate, 10 to 20 minutes, and 7 steps.[2]
- Six Y1 tri-wing screws hold the case: four on the back and two in the battery compartment. Three Phillips #1 screws hold the motherboard.[2][1]
- The display ribbon cable is held by a clip that you loosen with a plastic opening tool.[2]
Guides:Game Boy Pocket LCD Screen Replacement - iFixit Guide
5V power regulatorExperimental
- ⚠ Soldering Needs a soldering iron. Heat can lift pads and burn skin.
- ⚠ Lithium battery Uses or touches a lithium cell. A damaged cell can catch fire.
A drop-in board boosts the batteries to a steady 5V for IPS screens and flash carts, and adds a capacitor to clean audio noise.[6][1]
Parts
- Helders Game Tech Game Boy Pocket power regulator Fits — Installs with 3 solder points. Leaves the original DC power board in place.[6] Buy: heldergametech.com
Good to know
- It boosts the battery to a stable 5V for IPS screens and flash carts.[6]
- Input is 1.8 V to 3.0 V from AAA cells, or a LiPo battery. Output is up to 400 mA on AAA cells and up to 800 mA on a LiPo.[6]
- A tantalum capacitor is there to clean audio noise on the power rail. The original DC power board stays in place so backlight control still works.[6]
- Opening the case needs a Y1 tri-wing screwdriver for the shell and a Phillips #1 for the motherboard screws.[1]
Guides:No guide found yet.
USB-C and Li-ion batteryExperimental
- ⚠ Lithium battery Uses or touches a lithium cell. A damaged cell can catch fire.
A kit replaces the AAA cells with a Li-ion battery charged over USB-C. The USB-C jack and the charger are two boards. A third light board is optional.[7]
Parts
- giltesa Game Boy Pocket USB-C charging kit Fits — The USB-C connector sits under the Select button. The main board uses a TP4056 charger and a DW01A protection chip. The light board is optional.[7]
Good to know
- The kit replaces the AAA batteries with a Li-ion cell charged through USB-C. The Pocket's layout is why the design is split across boards.[7]
- The top board puts a 6-pin USB-C connector under the Select button. The bottom board has the TP4056 charging chip and the DW01A protection chip.[7]
- An optional third board adds status lights: white when on, red while charging, green when full. Playing while charging mixes those into pink.[7]
- The kit supports playing while it charges.[7]
Guides:No guide found yet.
Flash cartridgeWorks
- ⚠ Check the law May break a law or rule where you live.
An EverDrive-GB X7 plugs into the cartridge slot and runs your own Game Boy and Game Boy Color backups. Pocket compatibility problems were fixed in Rev. B.[8]
Parts
- EverDrive-GB X7 Fits with conditions — Rev. B is the revision that fixed Game Boy Pocket compatibility. It uses a microSD card.[8]
Good to know
- It runs your own Game Boy and Game Boy Color backups from a microSD card.[8]
- Compatibility problems with the Game Boy Pocket were fixed in Rev. B.[8]
- The cart has 8 MB of space, 128 KB of save RAM, save states, an in-game menu, and an isolated real-time clock.[8]
Guides:No guide found yet.
Sources (8)
- wiki Game Boy Pocket Repair - iFixit · 2026-11-14
- wiki Game Boy Pocket LCD Screen Replacement - iFixit Guide · 2026-11-14
- shop GBP/GBL Retro Pixel IPS LCD Kit - FunnyPlaying · 2026-11-14
- blog Mod Guide: Game Boy Pocket FunnyPlaying IPS LCD – residual media depot · 2026-11-14
- blog Mod Guide: Game Boy Pocket Backlit LCD – residual media depot · 2026-11-14
- shop Game Boy Pocket Power Regulator - Helders Game Tech · 2026-11-14
- blog Game Boy Pocket USB-C Charging Kit - el blog de giltesa · 2026-11-14
- shop EverDrive-GB X7 - Krikzz · 2026-11-14