Home › Devices › Nintendo › Game & Watch: Super Mario Bros.
 NEW!
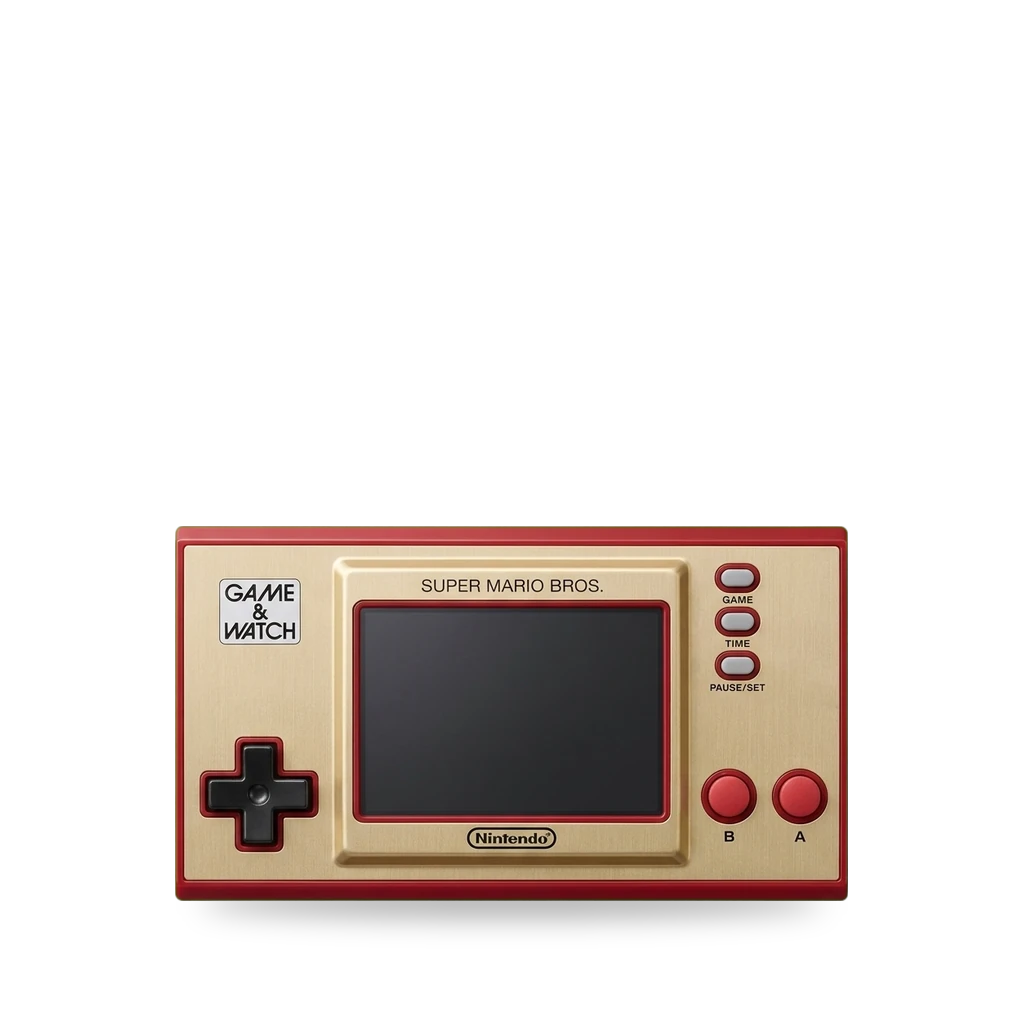
Photo: Artistosteles, CC BY-SA 4.0 · AI-edited (studio background)
.jpg)
NINTENDO · HANDHELD CONSOLE · 2020
Game & Watch: Super Mario Bros.
Also called: SM-35 · Game and Watch: Super Mario Bros. · Mario Game & Watch
Nintendo's 2020 Game & Watch for the 35th anniversary of Super Mario Bros., model SM-35. It has a color screen, an internal battery, and USB-C charging. Most documented mods run the Retro-Go emulators; one report ran DOOM.[1][4][2]
Which one do I have?
| Model | Variant | Year | How to tell |
|---|---|---|---|
| SM-35 | Game & Watch: Super Mario Bros. | 2020 | Model SM-35. Released 13 November 2020 as a limited handheld. 2.36-inch (6 cm) color LCD. About 67 mm by 112 mm by 12.5 mm, and 68 g. Internal lithium-ion battery, about 8 hours of play, charged by USB-C.[1] |
Mods (5)
⚠ Mod at your own risk. We collect what others have published; we have not tested these mods. Read the safety notes
Retro-Go emulatorsWorks
- ⚠ Soldering Needs a soldering iron. Heat can lift pads and burn skin.
- ⚠ Can brick A mistake can leave the device unable to start.
- ⚠ Lithium battery Uses or touches a lithium cell. A damaged cell can catch fire.
Retro-Go runs other consoles on this Game & Watch. Installing it means wiring a debug probe to the board's test pads. Back up the device first.[4][5][2]
Good to know
- Retro-Go emulates ColecoVision, Game Boy, Game Boy Color, Game & Watch LCD games, NES, PC Engine / TurboGrafx-16, Game Gear, Master System, and SG-1000.[4]
- In Retro-Go, Game acts as Start, Time acts as Select, and Pause/Set opens the emulator menu. Pressing power during play saves a state, then the unit sleeps.[4]
- The board uses an STM32H7B0 microcontroller and an external SPI flash chip. An empty header exposes the chip's SWD debug port.[2]
- Security mode blocks reading the chip's flash over SWD. RAM can still be read. The SPI flash contents are XOR-encoded; that encoding was worked out by comparing the flash dump with RAM.[2]
- The backup guide connects SWDIO, SWDCLK, and ground to test pads. Listed probes include an ST-Link or STM32 Nucleo, a full-size J-Link, a Raspberry Pi (GPIO 24 is SWDIO, GPIO 25 is SWCLK), a Raspberry Pi Debug Probe or Picoprobe, and a Flipper Zero running DAP Link.[5]
- The backup project includes tools to back up and restore the firmware.[5]
⚠ Watch out
Guides:Emulator collection for Nintendo Game & Watch - kbeckmann/game-and-watch-retro-goGame and Watch Backup and Restore Tools - ghidraninja/game-and-watch-backup
Dual-boot patch (keep Nintendo's menu)Works
- ⚠ Soldering Needs a soldering iron. Heat can lift pads and burn skin.
- ⚠ Can brick A mistake can leave the device unable to start.
- ⚠ Lithium battery Uses or touches a lithium cell. A damaged cell can catch fire.
A patch keeps the stock menu and starts Retro-Go with Left + Game. It can compress the Mario firmware so the external flash chip can stay.[6][5]
Good to know
- The patch puts Retro-Go in internal flash bank 2. Left + Game starts it.[6]
- It can LZMA-compress the Mario firmware into internal flash bank 1, so custom firmware fits without a larger external flash chip.[6]
- The same tool can load custom Super Mario Bros. game hacks and change the clock graphics.[6]
- It works with Sylverb's retro-go-sd bootloader on builds that add an SD card.[6]
- The backup guide attaches SWDIO, SWDCLK, and ground to the board's test pads.[5]
⚠ Watch out
Guides:Custom firmware for the newer Nintendo Game and Watch consoles - BrianPugh/game-and-watch-patchGame and Watch Backup and Restore Tools - ghidraninja/game-and-watch-backup
Larger SPI flash chipWorks
- ⚠ Soldering Needs a soldering iron. Heat can lift pads and burn skin.
- ⚠ Can brick A mistake can leave the device unable to start.
- ⚠ Lithium battery Uses or touches a lithium cell. A damaged cell can catch fire.
The stock external flash is 1 MB at 1.8 V. Retro-Go's docs name a 16 MB chip and a 64 MB chip as replacements. Back up and unlock the unit before you remove the original chip.[4][5][3]
Parts
- MX25U12835FM2I-10G (16 MB) Fits — Same package as the stock chip, and compatible with the stock firmware commands.[4]
- MX25U51245GZ4I00 (64 MB) Fits with conditions — A 64 MB chip in the Retro-Go build example. The 16 MB part is the largest the docs call the same package as the original.[4]
Good to know
- The stock external flash is 1 MB and runs at 1.8 V.[4]
- The 16 MB part MX25U12835FM2I-10G is described as the same package and compatible with the stock firmware commands. MX25U51245GZ4I00 is the 64 MB option.[4]
- A separate report lists 128 KB of internal SRAM, 1.3 MB of external RAM, and 1.1 MB of flash for firmware and games.[3]
⚠ Watch out
Guides:Emulator collection for Nintendo Game & Watch - kbeckmann/game-and-watch-retro-goGame and Watch Backup and Restore Tools - ghidraninja/game-and-watch-backup
microSD flex boardExperimental
- ⚠ Soldering Needs a soldering iron. Heat can lift pads and burn skin.
- ⚠ Can brick A mistake can leave the device unable to start.
- ⚠ Permanent change Cuts, drills or glues the device. You cannot undo it.
- ⚠ Lithium battery Uses or touches a lithium cell. A damaged cell can catch fire.
A microSD flex and a 64 MB flash chip, with a Mario flex file in the Retro-Go SD repo. The install cuts the shell for the card slot; a replacement shell is the other option.[7][8]
Parts
- PrimoAngelo Mario microSD flex Fits — The Retro-Go SD repo recommends this flex for the Mario unit, with a 64 MB 1.8 V SPI flash (MX25U51245GZ4I00 or larger).[7]
Good to know
- The Mario install uses the PrimoAngelo Mario flex, a 64 MB 1.8 V SPI flash (MX25U51245GZ4I00 or larger), a microSD slot, and a few small passives.[7]
- Mario dual-boot is flashed with gnwmanager flash-patch mario, using the Mario backup files and the bootloader.[7]
- The install steps include cutting the shell for the card slot. The repo also lists a replacement shell for people who do not want to cut.[7]
- A news article describes opening a Game & Watch with a tri-wing screwdriver, disconnecting the ribbon cables, and desoldering the speaker.[8] unverified
- That article also describes a 64 MB SPI flash chip or a custom microSD flex, and an ST-Link V2 soldered to the test pads.[8] unverified
DOOMExperimental
- ⚠ Can brick A mistake can leave the device unable to start.
One report got DOOM running after shrinking textures and changing how memory is assigned. It is a custom port.[3]
Good to know
- The report says the developers found ARM code loading from the external EEPROM into the STM32 and injected their own code to dump the stock firmware, which let homebrew code replace it.[3]
- DOOM needed memory-allocation changes and smaller textures to fit. The same report lists 128 KB of internal SRAM, 1.3 MB of external RAM, and 1.1 MB of flash.[3]
Guides:No guide found yet.
Buttons & modes
Sources (8)
- wiki Game & Watch: Super Mario Bros. - Super Mario Wiki · 2026-11-14
- news Exploring The New Super Mario Game & Watch - Hackaday · 2026-11-14
- news DOOM Running On The Nintendo Game & Watch - Hackaday · 2026-11-14
- docs Emulator collection for Nintendo Game & Watch - kbeckmann/game-and-watch-retro-go · 2026-11-14
- docs Game and Watch Backup and Restore Tools - ghidraninja/game-and-watch-backup · 2026-11-14
- docs Custom firmware for the newer Nintendo Game and Watch consoles - BrianPugh/game-and-watch-patch · 2026-11-14
- docs GitHub - sylverb/game-and-watch-retro-go-sd · 2026-11-15
- news Nintendo's Game & Watch hacked and turned into retro emulation beast - Tom's Hardware · 2026-11-14